Use your Raspberry Pi as your local NodeJS Webserver
*** An updated version of the article is available here ***
A couple of months ago, I tinkered around with NodeJS on my local machine. After a while I got kinda addicted to the NodeJS Plattform for webservice (SOA) applications as well as Desktop Apps (Electron/NodeWebkit). Hence more complicated NodeJS experiments will start, I decided to set-up my own webserver environment for my (local) network with a Raspberry Pi 2 B. My tools of choice are:
- Raspian Jessie Lite from 2016-05-27
- GIT v2.1.4: Version control for source code
- NodeJS v6.2.0: for REST APIs and Websocket applications
- Nginx Webserver: Deliver static files, Reverse Proxy for NodeJS, and Load Balancing
- MySQL Server and Client: for Relational Databases
- CouchDB v1.6.1: as my NoSQL Database with strong JavaScript tools
- PM2: NodeJS Process Manager for starting and stoping NodeJS Apps
- Nodeadmin: Admin Tool for MySQL (like PHPmyAdmin)
Let's get started:
Download Raspian Jessie Lite from the foundation website and write the image on your class 10 SD Card. For more information please read this tutorial (in German).
Configure your Raspian Jessie Lite
After the booting or Raspberry PI (rPI), please login with the standard user 'pi' and password 'raspberry'. If you successfully logged in, please run:
|
1 |
sudo raspi-config |
Now please configure your Raspberry based on your location and wishes (e.g. edit your timezone, region, keyboard settings, extend the memory space of your SD Card, make the GPU RAM free, if needed overclock carefully your rPI, change the Hostname and Password if needed). I would recommend to connect your rPI directly with your Wifi Router via classic LAN. It is mostly very stable and fast. But if you don't care what I think, please configure your wireless connection (wifi). A tutorial is available here.
|
1 2 |
# open the wifi config file sudo nano /etc/wpa_supplicant/wpa_supplicant.conf |
After all of this initial configuration please update the already provided library via those shell commands:
|
1 2 3 4 |
# update system and be sure that we get everything sudo apt-get update sudo apt-get dist-upgrade sudo apt-get upgrade |
By the way, for future times here is a nice list of very useful rPI commands.
Adding Version Control
In my early developer days CVS became the dead version control system and SVN was the hot shit. Time is changing and nowadays most people are using Git / Github / Bitbucket for their code version control instead of SVN. For making our workflow easier we install the Git Client.
|
1 2 |
# install git version control for github sudo apt-get install git-core |
Installing NodeJS and PM2
My main purpose of the testserver is to tinker around with NodeJS on a reliable backend level. In future I might want to play around with some Internet-of-Things stuff (e.g. connecting plants to the internet), too. NodeJS and Raspberry Pi is a killer prototyping tool for that. Installing NodeJS on a Raspberry Pi 2 is very obvious, because of its base ARM v7. The Raspberry Pi 3 seems to run a ARM v8 architecture, but that is not really true. The Raspian Jessie Lite still runs as a 32bit OS. As far as I understood that is the reason, why we still have to use the NodeJS ARM v7 version for the Raspberry Pi 3, too. However that makes the shell commands for this tutorial a little bit easier (the shell code is based on this thread).
|
1 2 3 4 5 6 7 8 9 10 11 12 13 14 |
#install nodejs for rpi2 or rpi3 against ARM v7 mkdir node cd node wget https://nodejs.org/dist/v6.2.0/node-v6.2.0-linux-armv7l.tar.xz tar -xvf node-v6.2.0-linux-armv7l.tar.xz cd node-v6.2.0-linux-armv7l #copies also readme and other not required files sudo cp -R * /usr/local/ sudo reboot node -v npm -v #the console output should be for node v6.2.0 and npm 3.8.9 |
NodeJS is executed as a single-thread. In that context it is not so simple to run several NodeJS apps simultaneously. This problem is solved by PM2, the NodeJS Process Management tool, which is our great companion. PM2 is the successor of the older process management tool forever. PM2 holds a nice interface and I like the console output for registered NodeJS apps much more than other tools. Therefore here we go:
|
1 2 |
# install pm2 globally, because we use it for all our NodeJS apps sudo npm install -g pm2 |
Installing the MySQL Database
Since the MEAN Stack as a Fullstack tool got very popular, the emerging NoSQL Databases started competing hard against the widely used Relational Databases like MySQL. In my opinion it depends on your data and application which database approach is the appropriate one for you. In my past developer times MySQL was very often a great help and its need is still valid for me. Therefore In my opinion MySQL is vital tool for my local testserver environment.
|
1 2 3 4 5 6 7 8 |
#install mysql sudo apt-get install mysql-server --fix-missing sudo apt-get install mysql-client #check if mySQL is Running and the version mysql -u root -p -e 'SHOW VARIABLES LIKE "%version%";' #console output should be MySQL Version 5.5.44 |
After we have entered a password for our 'root' user, and we have hopefully installed MySQL successful, the next little companion starts to arrive. In my early PHP coding days I really like phpMyAdmin for editing, deleting and query datasets in MySQL. Luckily the NodeJS community implemented a similar tool for us. Our new buddy is called Nodeadmin. Please navigate to your folder, where you want to place your NodeJS apps. In my case it is the home user folder '/home/pi/', which feels not to be the smartest idea (I am still in the process to figure out where to place my nodejs project files, recommendations are very welcome!).
|
1 2 3 4 5 6 7 8 |
# install mysql nodeadmin - a ui for mysql instead phpmysql mkdir nodeadmin cd nodeadmin npm install nodeadmin # For starting Nodeadmin, we have to create a NodeJS App Starter sudo nano nodeadmin.js # create middleware nodejs and run ---> url http://your-ip:3333/nodeadmin |
Unfortunately, nodeadmin does not start directly from the beginning. We have to create a NodeJS app by ourselves. It sounds worse than it is. If have typed in all the shell commands included the nano editor call, then we write our first NodeJS code.
|
1 2 3 4 5 6 7 8 9 10 11 |
///* --> nodeadmin.js file <-- *///// 'use strict' var express = require('express'); var app = express(); // add the nodeadmin middleware var nodeadmin = require('nodeadmin'); app.use(nodeadmin(app)); //Let Nodeadmin listen to Port 3333 app.listen(3333); |
Please safe the code with the key combination "CTRL+X" and "Enter". Now we can test our first NodeJS Server App on our Server. Let's start the app with our companion PM2:
|
1 2 |
#console / shell command pm2 start nodeadmin.js |
The console feedback should show you a running Nodeadmin server. You can also test it with your browser. Type the IP Adress and the Portnumber like this 'http://<your-rpi-ip-number>:3333/nodeadmin/'. In my case the website took some time until it should be the logIn screen. Maybe you will have the same problem, be please a little bit patient during the first start.
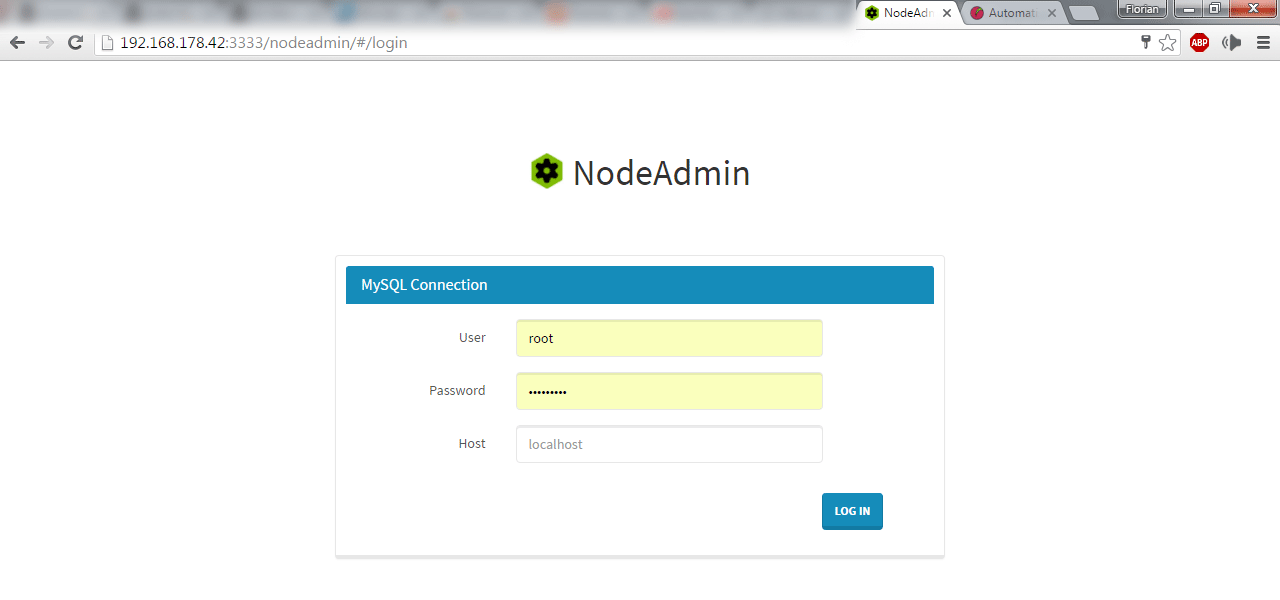
Nodeadmin LogIn screen with my local address
It is nice to have a MySQL Admin Interface (LogIn is the mySQL root user), but at the moment we have to start Nodeadmin everytime after the boot procedure manually. In my opinion that sucks. Let's add Nodeadmin to init.d start procedure:
|
1 2 3 4 |
# Inside the shell cd /etc/init.d/ # Create a Nodeadmin Starter Script sudo nano nodeadmin-init.sh |
Unfortunately, the simple startup creation procedure by PM2 does not work on my Debian Jessie Lite. Therefore, we have to write our own start script. Luckily there was a helpful tutorial available (sorry it is in German).
|
1 2 3 4 5 6 7 8 9 10 11 12 13 14 15 16 17 18 19 20 21 22 23 24 25 26 27 28 29 30 31 32 33 34 35 36 37 38 39 40 |
#! /bin/sh ### BEGIN INIT INFO # Provides: nodeadmin-init.sh # Required-Start: # Required-Stop: # Default-Start: 2 3 4 5 # Default-Stop: 0 1 6 # Short-Description: Starting Admin Panel for MySQL # Description: Nodeadmin is a PHPmyAdmin like interface for manage MySQL Databases ### END INIT INFO #Switch case fuer den ersten Parameter case "$1" in start) #action for start echo "start nodeadmin-init.sh" /usr/local/lib/node_modules/pm2/bin/pm2 start /home/pi/nodeadmin/nodeadmin.js ;; stop) #Action for stop echo "stop nodeadmin-init.sh" /usr/local/lib/node_modules/pm2/bin/pm2 stop /home/pi/nodeadmin/nodeadmin.js ;; restart) #Action for restart echo "restart nodeadmin-init.sh" /usr/local/lib/node_modules/pm2/bin/pm2 start /home/pi/nodeadmin/nodeadmin.js ;; *) #Default action if no start|stop|restart is called echo "(start|stop|restart)" /usr/local/lib/node_modules/pm2/bin/pm2 start /home/pi/nodeadmin/nodeadmin.js ;; esac exit 0 |
Again safe the file with "CRTL+X" and "Enter". Now we have to make it executable in our Shell.
|
1 2 3 4 5 6 |
# make the file executable sudo chmod +x /etc/init.d/nodeadmin-init.sh # register and update the booting queue sudo update-rc.d -f nodeadmin-init.sh defaults # after a lot install, lets restart our rPI sudo reboot |
Now the Raspberry Pi should start with Nodeadmin from the beginning. You can test it through a simple browser call from before 'http://<your-rpi-ip-number>:3333/nodeadmin/'.
However, now you should be able to work with MySQL. During my research I figured out that MySQL is also an old horse. MariaDB seems to be the new successor. Unfortunately the installation for MariaDB and usable Admin Interface is a little bit more complicated in connection with NodeJS. Maybe at sometime I will find an appropriate solution for that circumstance.
Installing our NoSQL CouchDB
After we have installed the relational database for very structured data, we want to install a NoSQL database with MapReduce functionality applied to less none structured/predefined datasets. Regarding the popularity of the MEAN stack I am sure you expect an installation of MongoDB. Unfortunately, the current MongoDB Version is kinda nasty to install on a Raspberry Pi. Furthermore, CouchDB holds some nice features compared to MongoDB, which makes it more attractive for me. Those features are:
- CouchDB works very well with JavaScript (e.g. the JS Query Interface in Futon) and NodeJS (NPM works with CouchDB)
- It can work very easily in clusters and can be connected with other databases and servers/computer
- CouchDB provides an out-of-the-box Sync solution between different databases in combination with Version Control of data sets.
- In Offline First App (or using the Google terminology Progressive Web Apps) can make a great use of CouchDB. Please check the great work of PouchDB (Clientside Database) and the Hoodie project.
Those four points summarize my motivation for diving into the CouchDB cosmos very well. Even the installation setup for the new version is more complicated. For the current version 1.6.1 (with an improved authentication user system), we have to compile it on our Raspberry Pi. The both CouchDB tutorials by Volker Koster were a great help for me. And here we go again back to the Shell:
|
1 2 3 4 5 6 7 8 9 10 11 12 13 14 15 16 17 18 19 20 21 22 23 24 25 26 27 28 29 30 31 32 33 34 35 36 37 38 39 40 41 42 43 44 45 46 |
# Install and preparing Compilers sudo apt-get install erlang-nox sudo apt-get install erlang-dev # Spidermonkey JS engine as lib sudo apt-get install libmozjs185-1.0 # Development headers for spidermonkey lib sudo apt-get install libmozjs185-dev # Dev files for libcurl (openSSL) sudo apt-get install libcurl4-openssl-dev # Dev files for icu (Unicode and Locales) sudo apt-get install libicu-dev # # Create couchDB account sudo useradd -d /var/lib/couchdb couchdb sudo mkdir -p /usr/local/{lib,etc}/couchdb /usr/local/var/{lib,log,run}/couchdb /var/lib/couchdb sudo chown -R couchdb:couchdb /usr/local/{lib,etc}/couchdb /usr/local/var/{lib,log,run}/couchdb sudo chmod -R g+rw /usr/local/{lib,etc}/couchdb /usr/local/var/{lib,log,run}/couchdb # Download Sourcecode for CouchDB version 1.6.1 wget ftp-stud.hs-esslingen.de/pub/Mirrors/ftp.apache.org/dist/couchdb/source/1.6.1/apache-couchdb-1.6.1.tar.gz tar xzf apache-couchdb-*.tar.gz cd apache-couchdb-1.6.1 # Compilation and installation #Configure the build ./configure --prefix=/usr/local --with-js-lib=/usr/lib --with-js-include=/usr/include/js --enable-init #compile make && sudo make install # Start couchDB sudo ln -s /usr/local/etc/init.d/couchdb /etc/init.d/couchdb sudo /etc/init.d/couchdb start sudo update-rc.d couchdb defaults # see if its running... curl http://127.0.0.1:5984/ # output shoud be an json object within the console # make couchdb user (created above) owner of local ini-file sudo chown couchdb:couchdb /usr/local/etc/couchdb/local.ini # make couchDB accessible within your network sudo nano /usr/local/etc/couchdb/local.ini # change binding address at [httpd] ---> 0.0.0.0 from before 127.0.0.1 and # do not forget to uncomment the row!! # Access Futon CouchDB Admin Panel from your notebook http://<your-ip-number->:5984/_utils/ |
Yeah, now we should have finished the installation of CouchDB on our machine and have even compiled the first software on our fresh rPI! Please check with your browser if Futon - the CouchDB Admin Panel - is running correctly.

CouchDB Futon Start Screen for version 1.6.1
If you want to be 100% sure that your installation was correct, please click the Button at right Panel "Diagnostic > Verify Installation" under the documentation link.
Installing Nginx Webserver
After the installation of NodeJS, MySQL, and CouchDB it seems all vital tools are available for starting tinkering around. In my opinion that is not true. Therefore, I decided to install an additional webserver, which runs beside our NodeJS apps. The main reasons of running a webserver beside NodeJS are:
- Deliver static files (html, css, images, and frontend js) is more efficient through NGINX than via NodeJS
- NGINX can act as a Proxy and Caching Server for NodeJS webservice calls (e.g. Reverse Proxy)
- Better Security management (secure your HTTP connection and e.g. CVE-2013-4450/Denial of Service attacks)
- Working with new generation protocol HTTP/2 (e.g. bundling HTTP request and Server Push)
- Support of Websockets (e.g. for WebRTC or other Websockets apps like crossbar.io)
The last to points of my arguments are only valid for Nginx bigger than version 1.9.5. Unfortunately, if you install Nginx through the usual 'apt-get' command, you do not get a higher version than 1.6.1. Even if you try to install the stretch repository will fail. This circumstance forces us to compile again our new tool (based on this tutorial). Back to the shell:
|
1 2 3 4 5 6 7 8 9 10 11 12 13 14 15 16 17 18 19 20 21 22 23 24 25 26 27 28 29 30 31 32 33 34 35 36 37 38 39 40 41 42 |
# inside the shell install the dependecies sudo apt-get update; sudo apt-get install libpcre3 libpcre3-dev; sudo apt-get update; sudo apt-get install libssl-dev; # go back to your home folder and download the software cd ~; wget http://nginx.org/download/nginx-1.10.1.tar.gz tar -xvf nginx-1.10.*.tar.gz; cd nginx*; #configure installation nginx ./configure --user=nginx --group=nginx --prefix=/etc/nginx --sbin-path=/usr/sbin/nginx --conf-path=/etc/nginx/nginx.conf --pid-path=/var/run/nginx.pid --lock-path=/var/run/nginx.lock --error-log-path=/var/log/nginx/error.log --http-log-path=/var/log/nginx/access.log --with-http_gzip_static_module --with-http_stub_status_module --with-http_ssl_module --with-pcre --with-file-aio --with-http_realip_module --without-http_scgi_module --without-http_uwsgi_module --without-http_fastcgi_module #compile nginx sudo make && make install; #test run the nginx Server. The output should be version 1.10.1 /usr/sbin/nginx -v # config nginx for user management and booting process of the rPI # create user for nginx server sudo useradd -r nginx; # add a starting script for nginx for booting cd /etc/init.d/ sudo wget https://gist.githubusercontent.com/spfaffly/0470343bc8d5e884392a/raw/c4a60c998059b866d923fbeff20cd0d82dcc15fa/nginx -O /etc/init.d/nginx; sudo chmod +x /etc/init.d/nginx; # set the anchor for the starting script sudo update-rc.d -f nginx defaults; # install a Starter Content and the user nginx to the owner fo the www folder sudo mkdir /var/www/; sudo wget https://gist.githubusercontent.com/spfaffly/d774f87b8cf9a1837d05/raw/2223babec34cb3e1732031556549eb307024572f/index.html -O /var/www/index.html sudo chmod -R 775 /var/www/; sudo chgrp -R nginx /var/www/; # configure the default nginx routing behavior sudo nano /etc/nginx/nginx.conf; |
After the compilation and the configuration part of Nginx, we have to edit the common Nginx setting file in the nano Texteditor. Please change the content of the file to:
|
1 2 3 4 |
location / { root /var/www/; ## update the server root folder index index.html index.htm; } |
Then save it with "CTRL + X" and "Enter". Afterwards, we have to activate the webserver settings through a restart. That can be done very easily through the shell/console:
|
1 2 3 |
# your commands for restarting the NGINX server sudo /etc/init.d/nginx stop sudo /etc/init.d/nginx start |
Now you can visit the starter content of our Nginx Webserver (which listens on the standard port 80 for HTTP). Just type in your IP number like that: http://<your-ip-number>
Nginx version 1.10.1 running on Raspberry PI
Now Nginx should run properly and you can modify the settings to a Reverse Proxy and/or Load Balancer for your NodeJS apps. If you want to add your frontend webcode and HTML files, please use the folder. It is kinda your web root folder.
/var/www/
Summary
After all this installation effort, we have finally a running webserver toolbox for our local network. But please consider: don't connect this server directly to the internet (via Port Forwarding) . Someone can hack your server and can get access to your complete Wifi traffic. If you really want to make your webserver accessible to your friends/other people via Internet, please follow some additional settings and configurations. Here are some helpful tutorials for preparing your server for the public. (For German people check here)
At the end of all action, I asked myself two questions (maybe later more):
- if it is really useful to make several user profiles for each software (see example nginx and CouchDB user). If yes, then I have to create an additional user for NodeJS and MySQL and maybe put all those user profiles in a "webserver" user group. Does this make sense from a Server Admin / DevOps perspective?
- The other question belongs to the folder structure of your system. At the moment you can put your NodeJS apps to the standard Pi user home folder. Does it make more sense to put NodeJS apps to a new shared folder like "/var/node-apps/"? How and in which folder does Webserver Admins install their software?
Regarding backend and webserver technology, I am pretty much a beginner. Some feedback from more experienced reader would be very nice. Thx in advance!
If you were looking for some NodeJS Tooling, here is a nice list with description
https://dzone.com/articles/10-areas-where-tooling-makes-nodejs-developers-mor
Furthermore, the service and Chrome App Postman looks interesting for testing your REST APIs
http://www.getpostman.com/
https://chrome.google.com/webstore/detail/postman/fhbjgbiflinjbdggehcddcbncdddomop
A nice article on HTTP2 and NodeJS with Express
Optimize Your App with HTTP/2 Server Push Using Node and Express
such a great starter book for Raspberry Pi and Linux beginners:
ESSENTIALS CONQUER THE COMMAND LINE – Raspberry Pi a TERMINAL GUIDE written by Richard Smedley
If someone is interested on running MongoDB on a Raspberry Pi 3B, then check this tutorial
http://yannickloriot.com/2016/04/install-mongodb-and-node-js-on-a-raspberry-pi/
If you want to run several NodeJS & NPM versions, then you can use the Node Version Manager (NVM) tool. The installation is described as Option 1 Install Node.js with Node Version Manager in this tutorial. The shell commands are the same for Raspberry Pi
http://www.hostingadvice.com/how-to/install-nodejs-ubuntu-14-04/#node-version-manager
If we are talking about the hype of server clusters, microservices and docker then these two links will make you happy:
HybriodOS – an Operating System for your RaspberryPi and your Docker Apps/Images
http://blog.hypriot.com/
http://blog.hypriot.com/post/high-availability-with-docker/
Hardware for your Raspberrry Pi Server Cluster
https://www.picocluster.com/collections/starter-picocluster-kits/products/pico-5-raspberry-pi-starter-kit?variant=29344698892
And some resources from the Raspberry Pi foundation:
https://www.raspberrypi.org/blog/docker-comes-to-raspberry-pi/
http://blog.alexellis.io/hands-on-docker-raspberrypi/
http://blog.alexellis.io/getting-started-with-docker-on-raspberry-pi/
http://blog.alexellis.io/5-things-docker-rpi/
If you playing around with the Raspberry Pi at a Hackathon, and you wanna make your app accessible from outside without changing the network configuration, then this tool might help you:
ngrok – Secure tunnels to localhost
Another great article about Reverse Proxy your NGINX server
http://blog.alexellis.io/save-and-boost-with-nginx/
https://www.nginx.com/resources/admin-guide/reverse-proxy/
https://www.nginx.com/resources/admin-guide/nginx-ssl-termination/
I’m not strong on Linux, but after getting this error during the compile:
sed -e "s|%%PREFIX%%|/etc/nginx|" \-e "s|%%PID_PATH%%|/var/run/nginx.pid|" \
-e "s|%%CONF_PATH%%|/etc/nginx/nginx.conf|" \
-e "s|%%ERROR_LOG_PATH%%|/var/log/nginx/error.log|" \
objs/nginx.8
make[1]: Leaving directory '/home/pi/nginx-1.10.1'
make -f objs/Makefile install
make[1]: Entering directory '/home/pi/nginx-1.10.1'
test -d '/etc/nginx' || mkdir -p '/etc/nginx'
mkdir: cannot create directory â/etc/nginxâ: Permission denied
objs/Makefile:1190: recipe for target 'install' failed
make[1]: *** [install] Error 1
make[1]: Leaving directory '/home/pi/nginx-1.10.1'
Makefile:11: recipe for target 'install' failed
make: *** [install] Error 2
pi@rpi3:~/nginx-1.10.1 $
I changed the line after #compile nginx:
sudo make && make install;to
make && sudo make install;This seems to be the correct syntax and the compile completed.
Then the following command should be:
#test run the nginx Server/usr/sbin/nginx/nginx -v
#not /usr/sbin/nginx -v
Something else is not right for me, as I couldn’t get nginx to start. I just thought I’d leave these comments in case they helped someone else.
Hey Andrew,
thank you very much for your feedback. The next time I will set up a new Raspberry Pi 3 at home. Maybe I will run in the same issue… thanks for your warning and providing your solution.
All the best,
Flo
Nice articles about securing your SSH access
http://www.codeproject.com/Articles/1152837/Securing-Your-Server-s-SSH-Configuration
https://www.digitalocean.com/community/tutorials/how-to-set-up-ssh-keys–2
The go based tool acmetools makes the generation process for SSL certificates (e.g. with let’s encrypt) much easier.
Raspberry Pi relevant links to this topic
https://blog.meinside.pe.kr/Lets-Encrypt-with-Go-ACME-Client-Utilities/
https://github.com/hlandau/acme/issues/141
https://github.com/hlandau/acme/releases
Hey, I think you could make this guide much more concise by using Docker containers, it’s seriously easy to run Node.js + NGinx + MySQL etc with very little configuration. I appreciate you’ve spent a lot of time getting the detail right, but there are easier ways. My blog has been quoted in the comments already.. I’m happy to talk to you through it.
I guess your title here is “NodeJS” but then there’s a good half dozen extra apps you are installing / setting up. A quick way to install Node is with tar and -C so:
curl -sSLO \https://nodejs.org/dist/v4.4.0/node-v4.4.0-linux-armv6l.tar.gz && \
tar -xf node-*.tar.gz -C /usr/local \
--strip-components=1
https://github.com/alexellis/docker-arm/blob/master/images/armhf/nodejs/Dockerfile
Hi @Alex Ellis
thank you very much for your comment! I agree with you. Working with Docker and NodeJS on the Raspberry Pi looks pretty straightforward. At the time of writing this article, I just was not confident enough using Docker. For few weeks, I already asked myself a few times, if the Docker approach eats more resources than the approach without Docker? Do you have any experiences with it? Running into RAM issues or something similar?
CouchDB 2.0 got some really significant features regarding cluster infrastructures, sync and offline capabilities. It seems more powerful and great than ever. Luckily, Andy Felong wrote a turorial how to install CouchDB 2.0 on the Raspberry Pi 3.
CouchDB 2.0 on Raspberry Pi by Andy Felong
Great introduction videos of Couch DB with NodeJS
https://www.youtube.com/watch?v=R6LUMXrAoCE
Some Basic CouchDB stuff
https://www.youtube.com/watch?v=nlqv9Np3iAU
Thank you very much!!
I have a question. If I connect Raspberry Pie to Wi-Fi, My ip will become dynamic ip.
When I turn the raspberry pie off and turn it back on, The running server is disconnected.
Is there a way to solve this problem?
Hi @Jusang
thank you very much for your feedback! You can solve this problem differently.
One approach could be to use the hostname instead of a IP address. For instance, I changed the hostname from ‘raspberry’ to ‘localdev’. Since then I type localdev into my adress field of my browser or putty (ssh client) software.
The second approach could be to assign a static IP address on your Raspberry Pi. On Circuit Basics is very nice tutorial, please check it out:
http://www.circuitbasics.com/how-to-set-up-a-static-ip-on-the-raspberry-pi/
https://www.modmypi.com/blog/how-to-give-your-raspberry-pi-a-static-ip-address-update
The third approach uses your router. The router software is usually able to assign always a fix ip adress to your Raspberry Pi, when it enters your network. How to do it depends on your router hardware and software. Here is a link for an AT&T router and another article about the (dis)advantages of this approach:
http://www.online-tech-tips.com/computer-tips/assign-fixed-static-ip-addresses-to-devices-on-home-network/
https://www.howtogeek.com/184310/ask-htg-should-i-be-setting-static-ip-addresses-on-my-router/
I hope that information answers your questions.
All the best,
Florian
@Jusang
Set up a reserved ip address in your router for your pi